Sunday, June 27

Christmas Carousel Horse

Free Printable #36

Designed: 01.06.10
copyright Beccy Muir

Carousel Horse Christmas Card

Carousel Horse 4
This is the last design in the carousel horse series and as you can see, it is Christmas themed with a holly rug and bells on it's harness and ankles.

Carousel Horse With Scallops


Originally Designed: June 2010
Remastered: September 2019
Original artwork by Beccy Muir, all rights reserved. Images are for personal use and must not be copied, swapped, shared, resold or mass produced without the express written permission of the artist.

Carousel Horse Card 3

Carousel Horse 3
This is the third horse from the series of four I drew recently, and the last one for the double tent card tutorial if you are keeping up. I've also finished the card example for the last horse, which is Christmas themed and will be posting all of them in a few minutes. Thanks for stopping by!

Saturday, June 26

Carousel Horse With Rug

Free Printable #34

Designed: 01.06.10
copyright Beccy Muir

Carousel Horse Card 2

Carousel Horse 2
This is the horse that I coloured white and positioned in the centre of the double tent card in a previous post. As you can see, I've changed the colours of the horse and the rug and saddle to give quite a different look. You could also cut off the carousel bar and just use the image as a regular horse if you wanted to... remember you have a license to be creative!

Friday, June 25

Tutorial - Double Tent Card


Tent cards are created by adding a folded cardstock insert at the base of the card (although sometimes they are constructed with a single long piece of cardstock) and by joining the top, front and back, to form a triangular, or tent, shape. The extra folding allows the card to stand open at the bottom creating depth and the illusion of three-dimensions. (It's not really as confusing as it sounds... trust me!)

These instructions are for making a double tent card, which is basically a card that has the extra folding in both the top and bottom of the card allowing the entire piece to stand quite open.

Requirements:
2 white card blanks (A5 size)
1 piece of acetate (1/2 A5 size)
3 carousel horse images - coloured as desired and cut out
Scrap piece of gold card (at least 3" x 2") - you can substitute something else
Pens for colouring
Knife and self-healing mat
Scissors
Decorative scissors
Border punch
Adhesives
Bone folder
Scoring tool
Some fairly dexterous fingers - desired but not required!
1. Cut both pieces of A5 cardstock in half to form 4 pieces that will be approximately 6" x 4 1/4". One will form the front of the card, one will form the back of the card (set them both aside), one will be cut in half for the folded inserts and the last one you will use to make the "palings" and the decorative punched border.
2. Cut one of the 6" x 4 1/4" pieces in half again to form two long, thin pieces that will be approximately 6" x 2". Score and fold each piece in half longways. Score about 1/4" from each long edge and fold again as shown in the picture below. Set aside.
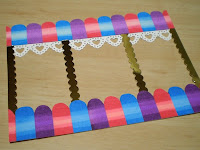
3. To form the front of the card, take one of the 6" x 4 1/4" pieces of cardstock and measure out three "windows". Leave about 3/4" between the top and bottom edges of the card and the windows, and about 1/4" between each window as shown below. Try and get them even, but don't worry too much about perfect measurements.
4. Use your decorative scissors to cut pretty "struts" for the windows from the gold card. You could substitute another colour if you wished or leave out this step altogether and simply colour the struts with markers.
5. Use your markers and another of the 6" x 4 1/4" pieces of card to make the "palings" for the carousel. You will need to have a total of 12" x 1" of coloured card from which to make your palings (obviously this will be in two pieces). Trim your coloured cardstock with knife or scissors to form palings that are about 1/2" x 1" in size. Use your scissors to round off one end. Don't worry too much about getting the rounded end perfect, but make sure you don't cut the palings shorter than 3/4".
6. Run some double sided tape along the top and bottom of the card front and adhere your palings with rounded ends pointing up. Always start in the middle of the card and work out to either side for a more balanced result.
7. Use your border punch to create a decorative strip of cardstock. Adhere it from the inside so that the decorative section hangs down behind the windows as shown. Now adhere the piece of acetate to the inside of the card to form the "glass". Run some adhesive along the top and bottom as well as the struts to keep the acetate firmly in place.
8. Adhere the middle horse to the inside, centre front of the card. Position it carefully keeping in mind that you have two other horses to fit either side. Try not to have the struts covering any part of the horse's face. Secure it with double sided tape, hard against the "glass" windows.
9. Decide which horse you want on the left hand side and adhere it to one of the folded pieces of cardstock as shown in the pictures below. I used some strong glue as well as a piece of tape to hold it in place.
10. Adhere the bottom folded cardstock (the one with the horse adhered to it) to the front of your card as shown. I used double-sided tape for this step. Ensure that you line up the pieces carefully so they sit correctly when the entire card has been constructed.
11. Now do the same for the top section, keeping everything lined up and centred. (This is where dexterous fingers have the advantage!)
12. Secure the top of the left-hand horse to the top folded piece of cardstock in the same manner as you attached it to the bottom. (Keep in mind that if you intend to fold this card flat for postage, you will need to fold the "pole" supporting this horse.)
13. The third horse is adhered to the right hand side of the back section of card. Check the position of the other horses when you are placing the last one to ensure none of the faces are obscured. You might want to raise of lower the position of this horse to indicate the way a carousel's horses rise and fall as the carousel turns.

14. Attach the back of the card to the two folded sections in the same way that you attached the front... and voila! You're done.

Thursday, June 24

Carousel Horse With Tassels


Originally Designed: 2010
Remastered: July 2016
Original artwork by Beccy Muir, all rights reserved. Images are for personal use and must not be copied, swapped, shared, resold or mass produced without the express written permission of the artist.

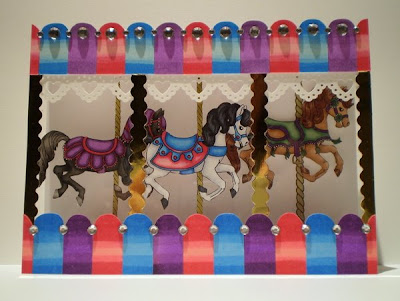
3D Carousel Card

A 3D Creation
I wanted to use several of these horses on a card that resembled an old-time carousel. This one is made out of two card blanks, some adhesive, rhinestones and copic markers and can be folded quite flat for mailing. I'm hoping to post a little tutorial for constructing one of these cards, which aren't too difficult but can be a little fiddly.


Wednesday, June 23

Carousel Horse Card

All The Fun Of The Fair
The border on this card was created with a Spellbinders die and the wonderful tutorial from Yvonne's blog... which is definitely worth a peek! The horse is one of my latest drawings, from a series of four that includes a Christmas design. I'll have the digital images up in the next week or so for you to use, along with some example projects and hopefully a tutorial of some description.

Thursday, June 17

Basket of Strawberries


Originally designed: June 2010
Remastered: April 2018
Original artwork by Beccy Muir, all rights reserved. Images are for personal use and must not be copied, swapped, shared, resold or mass produced without the express written permission of the artist.

Three Strawberries

Free Printable #31
These are the individual strawberries I used in front of the basket in the sidestep card. I also used them alone on the previous two cards I made, so they are quite versatile. Don't forget that you can resize them for whatever project you are doing, whether little gift tags or 12 x 12 scrapbook layouts.


Designed:16.06.10
copyright Beccy Muir

White Textured Card

With Love
White on White
I love white cards that have lots of texture and just a splash of colour as a focal point. They always seem so clean and elegant to me. I made the flowered border strip on this card with a Spellbinders die called Lotus Border Petites. There's an excellent tutorial for creating a gorgeous frame with this die on Yvonne's blog... you can then spend the next few hours drooling over all her wonderful, inspiring work!

Wednesday, June 16

Another Thank You Card

A Single Strawberry...
I love strawberries. Not only do they taste delicious and smell divine, but they also speak to me of country lanes and frosty mornings, hot tea and toast, picnics on red gingham cloths... everything good and simple in life. They always look great when piled together in an old tin bowl or, of course, as a part of a simple card that expresses a heartfelt message.

Sidestep Card

Thankyou Card
This is a sidestep card, which is surprisingly easy to make once you figure out how to fold and measure each section. It gives you the freedom to build up a scene with lots of depth since you have three different "layers" to work with.

I have a couple of other cards I want to make with this design before I neaten up the drawing and post it for you all to use. There are still a few older designs that I have on my desk waiting to be used, but I just felt in the mood to draw today and this is what I came up with. I love how the basket turned out so don't be surprised if you see a lot more of them in coming months!

Tuesday, June 15

Mr. Thom

Free Printable #30
I'm in the middle of a "doodle" purge at the moment (I just know you'd have a witty comment to make here Deirdre!) I have quite a few old designs that I haven't had a chance to use or post yet so thought it was about time I caught up. Mr. Thom is one of my earliest drawings, predated only by Miss Virginia, so I thought it was about time I introduced him.

Designed: 18.11.09
copyright Beccy Muir

One Grumpy Bear...
I designed this bear with my younger brother in mind. He recently turned the big three-oh and had a really hard time about leaving his carefree twenties behind (can't we all relate??). And even though this little guy looks all grumpy and sulky, he's still a lovely cuddly, squishy in the middle teddy bear... just like my little brother.


Monday, June 14

Miss Virginia

Free Printable #29

Designed: 18.11.09
copyright Beccy Muir

Autumnal Card

Spellbinders Leaf
Mojo Monday #143
Autumn is my favourite season of the year. The colours are warm and rich, the days are beautiful and warm and the nights are just starting to hint at the cooler months ahead. I also happen to love leaves and foliage, so it's pretty much a clean sweep!

I created this card based on the latest Mojo Monday sketch #143.

Pretty Greetings

Miss Virginia Card
This little lady is so sweet that I just had to surround her with pearls, flowers, and lacy paper. I used some lovely paper roses that I picked up at the scrapbooking expo being held here in Brisbane this weekend, as well as a couple of beautiful Martha Stewart punches.

Saturday, June 12

Flower Bear

Free Printable #28


Designed: 23.12.09
copyright Beccy Muir

Flower Bear Cards

Reader's Request
from Carmen...
Carmen requested some more bear designs and fortunately I have had this little guy waiting patiently in the wings to make his debut. This design would be perfect for Thank You cards and I'm Sorry cards, but also works for Birthdays, Congratulations, Get Well Soon or just blank greeting cards. He's quite an adaptable little fellow!

Friday, June 11

Christmas Deer


Originally Designed: December 2009
Remastered: November 2017
Original artwork by Beccy Muir, all rights reserved. Images are for personal use and must not be copied, swapped, shared, resold or mass produced without the express written permission of the artist.