Okay, I'm not going to deny it... this one was tricky. It wasn't until I'd made the whole card from start to finish that the mechanics of it finally clicked in my brain, I just couldn't get my head around it. However, it's a really fun card to play with, as are most interactive projects, and I will probably have a few more goes at this fold just to cement it in the old think-box.
TEMPLATE
1. Trim a sturdy piece of patterned paper to 51/4" x 51/4". Since this is the piece that will form the mechanism for the card, you don't want paper that's too light weight... good quality scrapbook paper will do the trick here.
2. Now you're going to make cuts on three sides of your square of paper, 1" from each edge. The cuts will be at the top, bottom and right hand side of the paper. Refer to the template above and the photo below for correct placement.
3. Now score vertically down the left hand side, 1" from the edge and 1" from the top and bottom. You should have a flap of paper that opens like a book. Again refer to the template and photos.
4. Working only on the centre flap of paper, score vertically at 21/2" and 4". Make a mountain fold and a valley fold respectively.
5. Now we're going to work on the message tab, which is the piece that is revealed when the card mechanism is activated. Cut a piece of card stock measuring 11/2" x 33/4" and stamp your sentiment toward the right hand side of the card. You can use a corner punch to round off the top and bottom corners if desired.
6. Lay the message tab over the centre flap of paper and mark it's width on either side. You can measure with a ruler if you prefer, but I found it quicker just to lay the message tab down and mark the sides with my pencil.
7. Now we need to cut a small opening for the message tab to slide from. Your opening should be slightly wider than the tab and about 1/2" from the right hand side of centre flap of paper (or 1/4" to the left of the last score line). See the photo below for the correct placement. I used a craft knife and ruler to make the opening but a trimmer would also work.
8. Now flip the paper over keeping the slit you just cut to the right hand side of the paper.
9. Apply some adhesive to the left hand end of the message tab, coming in no further than 1/2" from the edge.
10. Flip the message tab over, keeping the adhesive on the left hand side. Insert the right hand side of the message tab through the slit, lining up the edges and keeping the tab centred on the paper flap. Refer to the photos below.
11. Once you have the tab centred and flush with the right side of the paper flap, press down on the adhesive to secure the tab to the paper.
12. Flip the paper back over. You should now be able to see a small section of the message tab poking through the slit in the paper.
13. The next step is to add the t-slide, which is the mechanism that gives the card it's name. You'll need two pieces of card stock, one measuring 11/4" x 41/2", which will be the pull tab, and the other measuring 1/2" x 33/4", which will be the slide.
14. Round off all four corners of the slide with a corner rounder or small pair of scissors. If desired, stamp the word "pull" on the left hand end of the pull tab and round off the left hand corners.
15. Flip the paper over again and add a piece of double sided tape to the 1/4" section of the centre paper flap. It's the small strip of paper between the last score line and the edge.
16. Now secure the slide over the double sided tape, making sure the left hand edge of the slide is flush with the slit you cut earlier, and the right hand edge of the slide is flush with the edge of the paper flap. The slide should be centred over the paper flap so that 1/4" extends beyond the top and 1/4" extends beyond the bottom of the paper flap - the slide should be the same distance from the top of the paper as it is from the bottom.
17. Apply a strip of double sided tape to the very end of the pull tab.
18. Secure the pull tab to the slide, making sure it is centred over the message tab. About 1/2" of the pull tab should extend beyond the left hand side of the paper as shown in the photo below.
19. Flip the paper back over. You should only be able to see a small section of both the pull tab and the message tab.
20. You can have a go at sliding the mechanism now. The pull tab should draw up the centre paper flap to reveal the message tab beneath. (hint: it occurred to me that you could probably leave out the message tab and simply have a message or image stamped on the card stock beneath the paper... but I'll leave that up to you).
21. Okay, turn the paper back over again. It's now time to place all the adhesive strips so we can secure the paper and t-slide to the card base. Be careful where you place the adhesive as you can quite easily glue everything shut!
22. Start by placing strips of double sided tape at the top, bottom and right hand side of the paper, flush with the outer edges.
23. Now add two shorter pieces on the left hand side, staying about 1/4" away from the top and bottom of the pull tab.
24. The next strip sits to the right of the centre paper flap and extends the full length of the paper.
25. Add two more long strips at the top and bottom of the paper, about 1/4" from the first pieces you added. Make sure you don't get too close to the area where the slide runs. As you can see, I've left plenty of room along the edge of the centre paper flap for the slide to freely travel.
26. Finally, add two small pieces either side of the message tab on the left hand side of the centre paper flap. Again, be sure that the adhesive does not extend over the area when the slide will travel.
27. Remove all the backing strips from the double sided tape and secure the paper onto a piece of heavy weight card stock measuring 51/2" x 51/2".
28. If you've placed all the adhesive in the correct places, you should be able to pull the tab to reveal the hidden message. It may take a few goes to get the new mechanism to run smoothly.
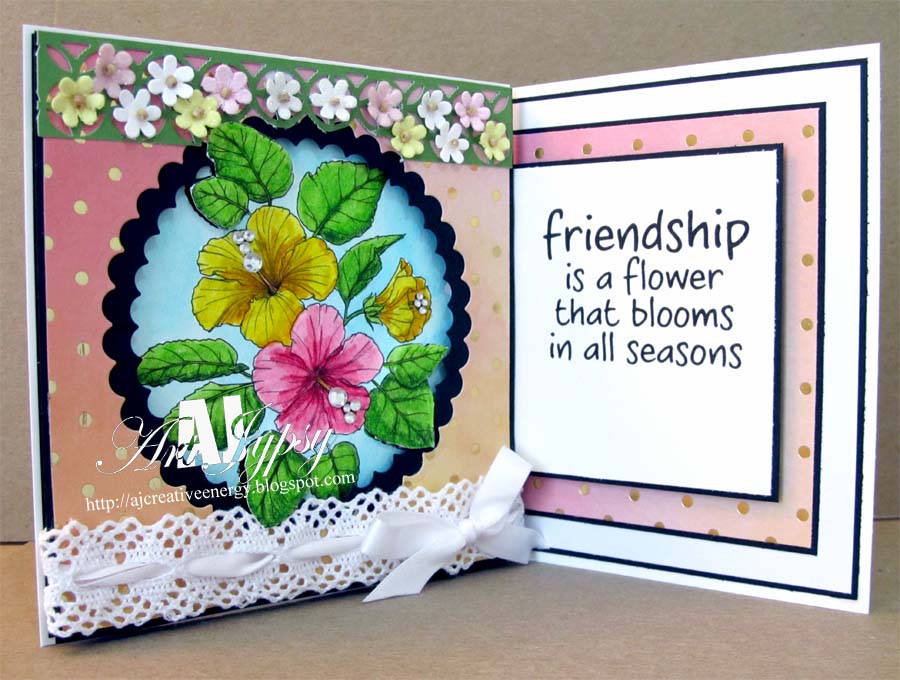
29. To decorate the front of the card, you'll need to prepare a square panel measuring 31/4" x 31/4". You can add stamped images, sentiments and whatever embellishments you'd like to complete your card. The panel will sit in the very centre, directly over the paper flap.
30. Add some adhesive to the left hand section of the centre paper flap, making sure you stay within the boundaries created by the score lines.
31. Secure the image panel to the centre paper flap, and you're done! When you operate the slide mechanism, the image panel should lift to reveal the hidden message. You can now add additional embellishments to the front of your card if desired.
Although this card is a bit of a challenge, it's definitely worth the effort, especially for those extra special occasions where a little more pizzazz is needed. I hope you'll give it a go.
Stamps: